Friday 24 October 2014

Love These Gorgeous Girls - Version 2

I originally shared this layout as part of my Scrapmatts DT work for this month. However, due to Harrison going through a grumpy stage I didn't get to quite finish it as I'd imagined it in my head. Today I would like to show you the new finished version, with some paint splatters, builders tape, buttons, crackle accent and journaling added. I also changed the photo over to black and white. You can see the original version here, let me know which one you prefer.


I was originally going to journal about my 30th birthday, which was when this photo was taken, but then I realised the girls meant much more to me than just one night. My journaling speaks about the support these ladies have provided me during my pregnancy (I was 26 weeks in the photo) and becoming a first time mum.

 
Now that I've added the journaling, I can also enter it into the current challenge at Once Upon A Sketch. The theme is "The women/girls etc in our lives...". I have rotated the sketch below counter clockwise to suit my photo.
 

Monday 20 October 2014

Friendship Card - Couture Creations DT

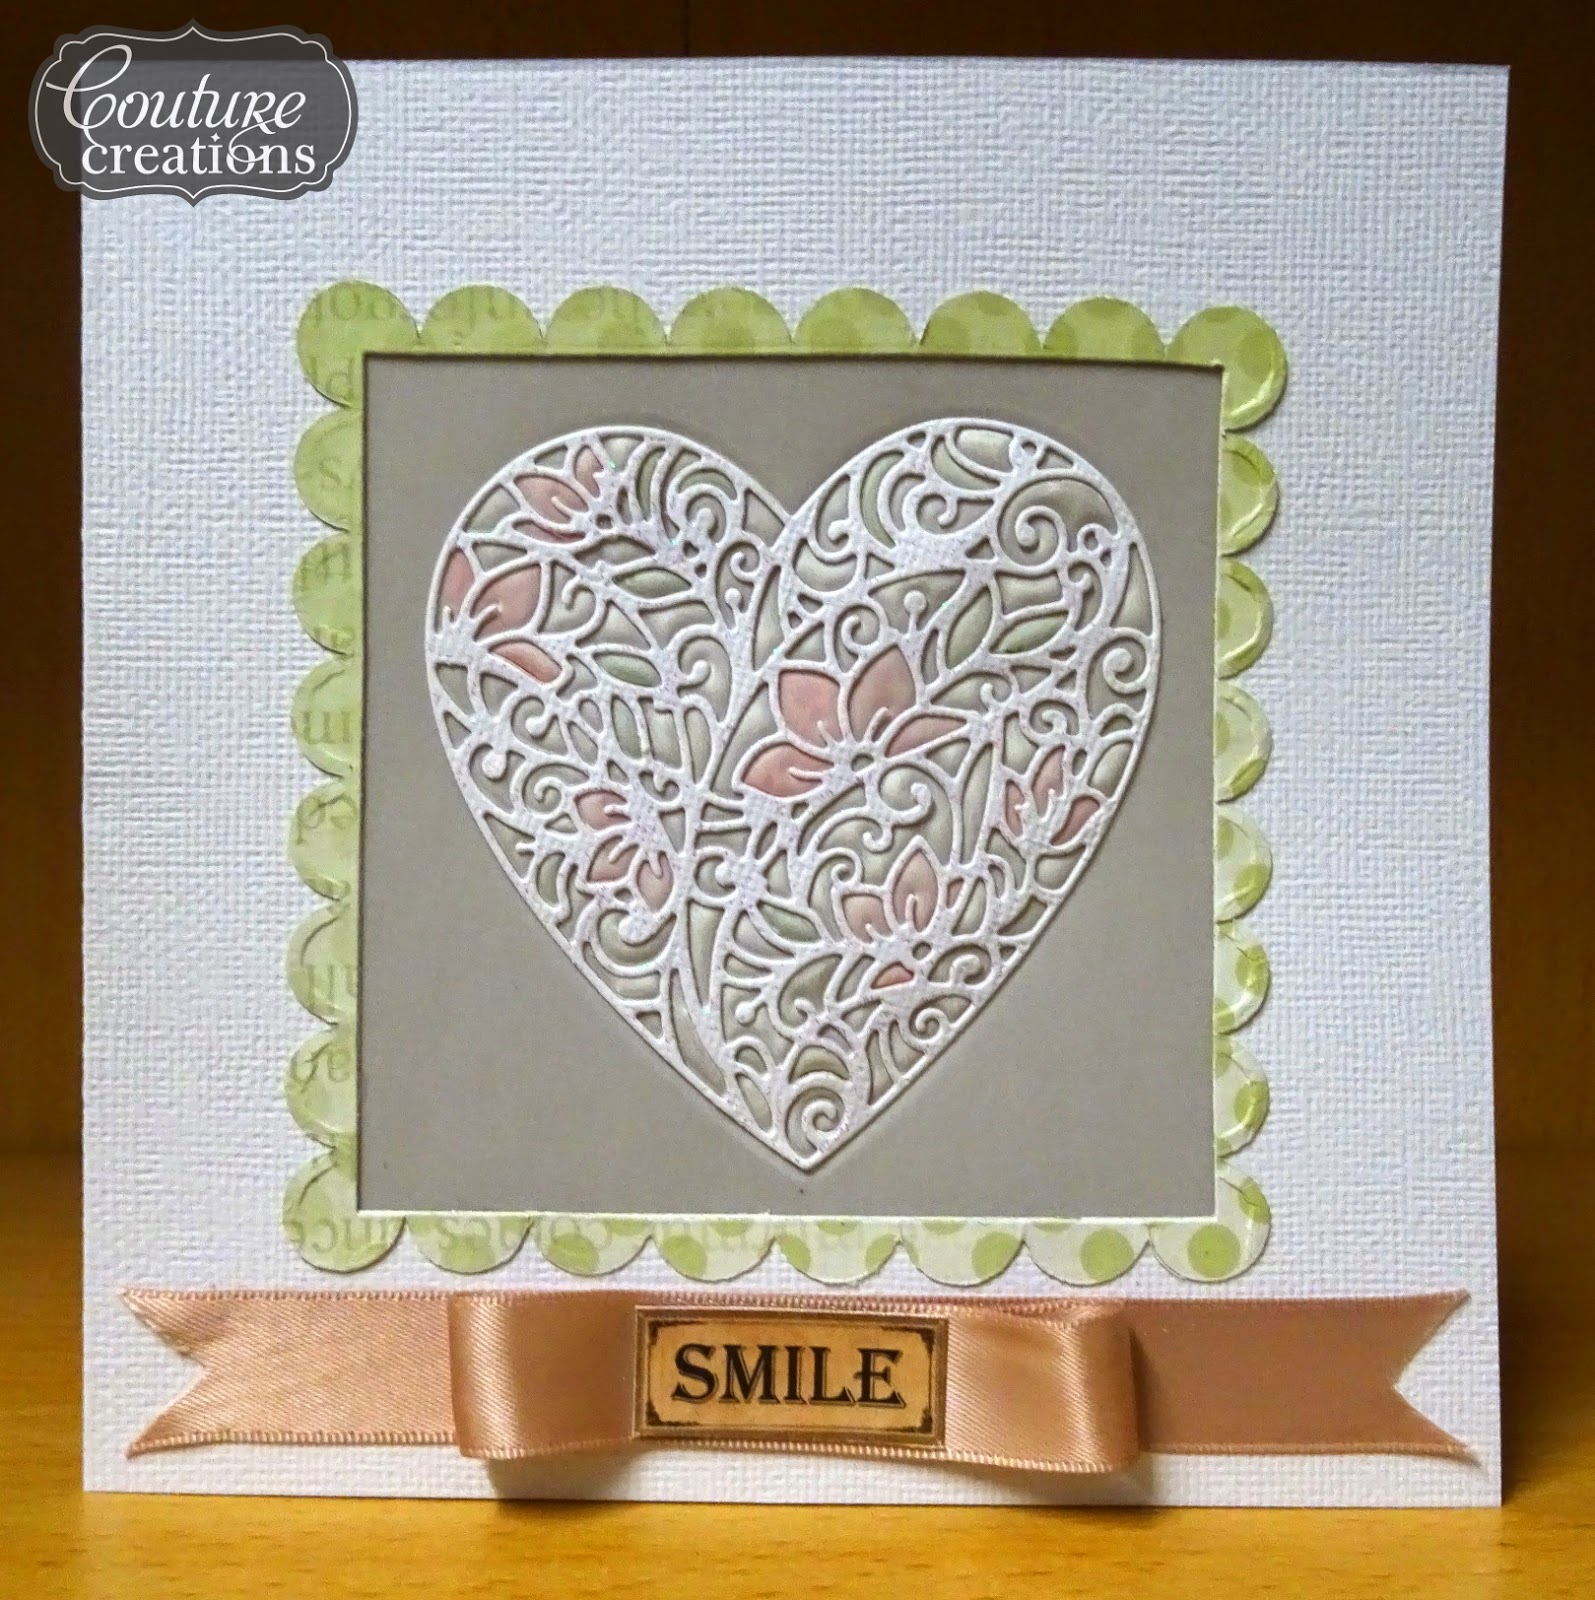
I think it's always good to try new things once in a while to help you learn new techniques or styles. With that in mind, I have a created a very girly greeting card for my second project this month with a muted colour pallet. I hope you enjoy it and are inspired to try something new yourself.
 
 
1/ Cut your cardstock to 12" x 6", scoring it halfway and folding to create the base.
2/ Cut the middle panel out of the cardstock using the largest Square nesting die, ensuring you have centred this.
3/ Use the centre square piece to cut Touch of Love from the Floral Lace collection. Because this is such a delicate design I strongly recommend you use the Quick Release paper with this and run it through your machine a couple of extra times. Most of the design will then fall away easily, use your craft knife to get those last stubborn pieces. 
4/ Use your finger to rub Crystalina Glitzin Glamour over the heart and set aside to dry.
5/ Use the largest Scallop Square nesting die to cut the border from the green spots side of a sheet of Time from the Vintage Rose Garden paper (if you want to ink your border edges, now is the time to do it). I then used the same Square nesting die to cut out the inside of this and adhere it to the cardstock. Be careful when lining it up or you wont get a single solid border piece, you can always glue the scallops on individually if this happens.
6/ Cut a piece of vellum slightly larger than the window of the card. Run this through your die-cut machine with the Floral Lace die, however add in the embossing mat to your sandwich (you may need to remove one of the tabs, depending on how your machine works) so the design is embossed into the vellum rather than cut out of it.
7/ Use watercolour pencils to colour some elements of the design on the back of the vellum. I used a wet paintbrush to lift the colour straight from the pencil and applied a couple of layers to get a nice thick coverage so you can see it from the front of the card. The picture below shows you the back of the vellum so you can see which elements I have chosen to colour.
 
 
8/ Once your watercolours are dry, adhere the vellum to the back of the window. Adhere the white die-cut to the front of the vellum, I used spray adhesive for this.
9/ Adhere ribbon to the bottom of the card as shown in the photo.
10/ Cut the 'Smile' sentiment from Butterflies & Words paper from the Vintage Rose Collection and adhere to the centre of the ribbon.


Couture Creations Materials List:
CO723998 Vintage Rose Garden 12" x 12" paper, Time
CO724020 Vintage Rose Garden 12" x 12" paper, Butterflies & Words
CO724005 Floral Lace Collection, Touch of Love
CO723042 Nesting Dies, Square
CO723043 Nesting Dies, Scallop Square
 

http://lozcraft.blogspot.com

Thursday 16 October 2014

Love These Gorgeous Girls - Scrapmatts DT

 
 Thanks for popping by to see my latest layout featuring Scrapmatts chipboard. I love this Leaf Spray design, which comes with seven pieces and is very versatile. I've also popped in a couple of Scrap Words which I've found can be used on almost every layout.
 
 
Scrapmatts used: CB4063 Leaf Spray 13; CB1189 Scrap Words 01


Tuesday 7 October 2014

Christmas Card - Couture Creations DT

It's now October which means less than three months until Christmas! I'm sure there are a few organised crafters out there who have already made all their Christmas cards for this year. However, if you are like me you probably haven't even thought about it and will go through a mad rush of creating sometime in November or even early December. For this reason, I keep my Christmas card designs pretty simple so I can mass produce them. The trick is to include something in the card to introduce a 'wow' element to make the design pop and embossing is a great technique to achieve this.
 
 
Here are the instructions for re-producing the card above:
1/ Cut your cardstock to 6" by 8". Score halfway and fold to create the base. My green paper is 1/4" smaller than the base, and the cream paper 1/4" smaller again. The green banner is 3.5" wide, cut it to your desired length.
2/ Run the cream paper through the Bouncing Baubles embossing folder from the Christmas Collection. I have then gently rubbed a sand coloured ink pad over the top to really bring out the great bauble design.
3/ Using the Scallop Circle nesting dies, cut out a red background shape for your sentiment.
4/ Ink all the papers, including your sentiment die-cut, with red ink.
5/ Cut a set of Pine Needles from the Merry Little Christmas Collection.
6/ Adhere all the elements as shown in the photo. The scalloped circle is mounted on foam tape and the sentiment is mounted on top of that using more foam tape to add some dimension. My needles are only adhered under the sentiment so they can fold up a little.
 
Good luck with all your Christmas card creating!


Couture Creations Materials List:
CO723041 Nesting Die, Scallop Circle
   
http://lozcraft.blogspot.com