Thursday 25 May 2017

Nana's Love - D-lish Scraps

Have you ever been holding onto that special photo just waiting for the right papers or embellishments to match it? I have had this photo of my mum and son (her first grandchild) for almost three years, just waiting. This month the stars must have aligned, because not only did the perfect paper range come out but D-lish Scraps started stocking floral die-cuts and watercolour flowers. It was time to stop waiting and start creating!


My bottom cluster has some fussy cut flowers and stamping as the base layer. I used a blue Little Birdie - Watercolour Gianna flower as the feature, and tucked in a purple paper flower, a flair button, the resin flower and some half-pearls from a past Just Add Paper kit. 


The main cluster has a lot more fussy cutting at the base. I repeated a lot of the same elements as the bottom cluster, this time using a Little Birdie - Watercolour Heather flower as the feature. Tucked in around this is another flair button, two different paper flowers, two petite resin roses, a sequin bow (I've been wanting to use one of these for AGES) and some more half-pearls from a past Just Add Paper kit. 


I love the look of these new Creative Cuts for adding a subtle touch of detail. I did a watercolour background wash and then adhered the cuts over that for some white-on-white texture. The puffy alphabet stickers were perfect for my title.


There are so many different wonderful embellishments at the D-lish Scraps store I'm sure you'll be able to find just what you need to scrap that special photo you've been saving. Stop waiting and start creating!

Wednesday 10 May 2017

Hey Mr DJ - D-lish Scraps DT

Do you remember the amazing Retro Revival Just Add Paper Kit that was released last month, with all the beautiful reds/yellows/blues? I purchased it just for the headphones flair (so perfect for these photos of my son) and then used it to create this white/black/lime green layout!


I stated off by ripping the navy stripe bag into strips and adhering it to the cardstock as a background around where I wanted to later place my photos. I used lime ink on a script stamp over the background area, then applied the lightning washi tape in random strips over the top of that too. Lastly, I mixed some black acrylic paint with texture paste and applied that through the stencil that came with the kit.


The flair and sneaker charm were the perfect embellishments for my clusters, along with some lime green enamel dots.

I have a whole bunch of coloured wire rolls that have come with various kits and I have never used them before, because I just didn't know how. For this layout the wire reminded me of the cords trailing at the bottom of his headphones, so I've tried to replicate that and turn it into part of the title. The wire is actually really easy to manipulate into the shape you want.

So hopefully my layout has inspired you to look at some of those Just Add Papers kits in a different way and not feel like you're stuck using them to create a layout in the colour scheme of the mood board challenge they go with. Think outside the box and have fun!

Sunday 7 May 2017

Thank You Stars - Scrapmatts DT

I also created a little bonus project this month. Harrison had painted these wooden star bases earlier and I was saving them for a 'special occasion'. We had a few elderly neighbours pop round to give him some Easter treats, so I turned the stars into thank you gifts with the addition of a photo and some Scrapmatts chipboard. The sentiment is CB6020 Words 06, coloured with a silver sharpie. I've also added a couple of stars from CB1223 Stars 03 painted with acrylic paint.


Saturday 6 May 2017

Rough and Tough - Scrapmatts DT

I often take my camera out while I'm supervising my son in the backyard so that I can snap a couple of photos while he's playing. On this occasion he had made quite a mess mixing up some mud with left over rain from the night before and was having a fun time jumping in the muddy puddles. I thought this photo just really summed up play time for Harrison at 2.5 years old: on his play set, with a couple of cars and a digger, barefoot and dirty with his little chubby feet.


I really wanted to capture the 'messy' aspect of having an active toddler, while still keeping a 'clean' layout design. The paint splatter stencils ST1009 and ST5010 were perfect to create that effect, using a little bit of mist. I mixed the same mist in with some texture paste and painted the title pieces from CB4055 Assorted Words 09 as well as some CB1078 Gears 05 pieces, you can see the great effect this created in the close ups. I covered a CB5117 Tabs 01 piece with patterned paper and added it to my top cluster.


I've got to admit that I love looking through layouts on Pinterest and scraplifting them. I generally use them like you would a sketch, so I get some design basics then put them away and work on the embellishments and finishing touches myself. I actually based this layout on the below Pin.

page d'icenalys avec la collection Floride de Swirlcards:

Friday 5 May 2017

Look @ Me - Scrapmatts DT

I'm normally a pretty bright and colourful scrapbooker but this layout took it to the extreme! I wanted a chance to get messy with some mixed media and when I found this selfie of my husband I knew it would be perfect for a bright and colourful page.


I found a stunning rainbow explosion layout on Pinterest and it just happened to have a tutorial attached showing how to create the background. So this was the basis for my layout, however I gave it a bit of my own touch.

Fotor_143887982553074:

I started by doodling my background in Gelatos, then washing that out with some water and playing with how the drips ran. The background has some extra texture as I applied gesso through stencil ST5003 on the left and right sides. That's as far as I followed the tutorial before going off on my own path. 


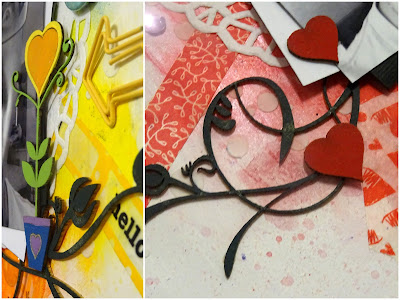
I matted my photo with the doily and some black and white cardstock. I then applied the strips of washi tape to colour match the background. The heart topiary (CB1110 Topiaries 01) is a classic chipboard piece, I've used two packs in my time with Scrapmatts. CB4063 Leaf Spray 13 flourishes in black provide some contrast to all the colour. I've used CB1159 Hearts 05 in the red, CB1166 Cupids 01 in white mist finish in the purple and CB6116 Assorted Words 29 for my title. All that was left was a couple of different sequin colours, resin dots and the paperclip arrow. Add some journaling and a doodled border and it's all done!

Wednesday 3 May 2017

Lynda's Wedding Album

This was a project which spread MANY years. It started with some idle chatter over the lunch table back in 2012 or 2013, when I was talking about my scrapbooking and Lynda mentioned she had never received a wedding album, only a collection of all her photos in a binder. Somehow I volunteered to create a scrapbook album for her of her wedding. The problem was then she went on maternity leave (for over a year), then I got pregnant and went on maternity leave (for over a year) and somehow the project still hadn't been completed.


For some unknown reason, I decided to make all her pages as double spreads. This is despite the fact that the only other time I create doubles is for the Gold Coast Show, so getting sketches and layout designs was a challenge.


I then found it really hard to work out which photos to use as I didn't have a connection to any of the people or know their backstories.


I picked Kaisercraft's After 5 collection of papers for the whole album to lend a cohesive feel to the album. The monochrome design worked well with Lynda's wedding colour scheme but I'm not sure if it ended up feeling a bit monotonous overall. Originally I had planned to have different pops of colour on each page, but that didn't eventuate.


I was also a little bit limited in the embellishments I could use, as I wanted to keep the pages fairly flat to avoid warping over bulking flowers or such.


By the time I got around to photographing the finished album I was bit over the whole project, so the photos really aren't the best quality. Now that I'm looking back at the work I put in, I should have spent that bit extra time at the end to show off the work I'd created.


There was a lot of preparation work involved in this album, much more than when I do individual pages. I had to find a whole bunch of double page sketches (you can check out my Pinterest board if you're interested).


I then worked out which sketch would work for each page based on how many photos I wanted to use. 


I then laid down all the large background layers of paper, making sure they were all edged in charcoal coloured ink, before attaching the photos.


Second time through the album was to add any paper embellishments (die cuts, border strips etc) and ribbons.


Third sweep through was to add the dimensional embellishments: chipboard, rhinestones etc.


Like I said, by the time I got around to photographing the album, I was a bit sick of looking at it, so I didn't even take the pages out of the protectors.


It was only after I'd already delivered the album to Lynda that I looked at the photos I'd taken and realised they all had a blue tint to them. I've tried to fix them up a bit with post-editing, but there's only so much you can do.


Anyway, the important thing is that Lynda was happy with the end result and I finally got it finished!


Tuesday 2 May 2017

8th Blogoversary (delayed)

I made my first blog post back on the 15th of April 2009! Looks like it was a mixture of scrapbooking layouts and ATCs back then. I'm sure I never imagined I'd still be updating it 8 years later!

For a number of years I used to do a blogoversary update post, reflecting on the challenges and achievements of the previous year. I forgot to do it entirely last year, though looking at the stats I'm not surprised. Annually between 2009 and 2014 I would average 82 blog posts a year, last year I posted 26 in total. It's pretty safe to say that looking after a toddler took up most of my time and energy! It looks like we're moving out of that stage though, so I'm able to spend some more time crafting this year.

I've missed the April 15th anniversary date but figured it's a case of better late than never, so here is the review for 2017. As per tradition, let's review the last set of scrapbooking goals I set myself in 2015:
1/ Scrap what I want to, without consideration of the visits or comments it may generate for the blog - still a very valid consideration, given the limited amount of time I have available to craft. I'm very lucky that my two design teams let me scrap whatever themes/project types I like as long as I feature their products. I'm also enjoying my crafting a lot more by being able to capture the memories of whatever I want, rather than confirming to a challenge criteria. 
2/ Finish Lynda's wedding album - can't leave this hanging around forever! I did actually finish this, but I don't think I ever got around to creating a blog post to show it off. I'll try to get on to that in the next few days. I certainly learnt from this experience to never again volunteer to create an album for anyone.
3/ Try to generate some extra interest in entering the Gold Coast Show by other crafty ladies - this certainly did not happen. I didn't enter the Show last year (had layouts ready but forgot to submit the entry form on time) and the standard was lousy. The criteria for this year is a joke, with only 4 categories instead of the usual 11.
4/ Try to actually keep a clean craft room - I know I will fail at this but I need to find a way of keeping it more tidy - failed, no further comment. :)
5/ Keep making time to create - I need to remember that it's alright to make time for me and to use my 'free time' on things I want to do, not boring things like cleaning the house - this remains a work in progress, but one that I am being a lot more successful at this year.

Hmm, so what can I set as my goals for 2017? I've already challenged myself by signing up for a second design team. How about we go with:
1/ Stay ahead of schedule for my design team commitments. I'm a horribly 'last minute' scrapbooker and I want to avoid that in future, especially as it leads to lower quality results.
2/ Remember to have fun when scrapbooking and try new things.
3/ Attend some more classes. They're a great way to make friends and learn new techniques.
4/ Think about attending a retreat later in the year. I've missed attending these since having Harry and think he's at a good age to be getting back into them.
5/ Finish all those half-finished layouts I have! On the rare occasion I clean my craft room I always find the box with all my half-done projects and think 'I should really finished those' but never get around to it.

Because I work a government job and am used to having to justify projects with numbers, I have previously tracked pageviews, posts and followers, so figure I may as well continue with that.

Date of review
Annual Pageviews Total Pageviews Annual Posts Total Posts Total Followers
20-Apr-12

5736

264
50
15-Apr-13
20660
26396
118
382
95
14-Apr-14
14844
41240
72
454
98 (20 via bloglovin)
15-Apr-15
20331
61571
87
541
108 (26 via bloglovin)
15-Apr-16
Did not record
1-May-17
21182
82753
76
617
105 (30 via bloglovin)

Blogger stats tell me my most popular posts since the opening of my blog are presently:
Entry
Pageviews
4 Jun 2013, 5 comments
860
14 Jun 2010, 2 comments
670
21 Jan 2015, 2 comments
568
20 Apr 2014, 2 comments
520
22 Jul 2012, 27 comments
372
Anyway, that's a wrap for this review. Hopefully I'll be back on track for next year's one.:)

Monday 1 May 2017

Roadtrip Sunset - D-lish Scraps DT

I took the most amazing sunset pictures at the end of a roadtrip around O'ahu, Hawaii and have just been waiting for the right time to scrapbook them. The D-lish Scraps moodboard for May was perfect and I'm really happy with the end result.

Regular visitors to my blog would probably have noticed that I have a preference for Kaisercraft papers and normally stick to the one range per layout. Recently though I've been trying to use up the rest of my stash of paper and it's quite fun to mix and match paper ranges. This layout has at least four different brands being used and the narrow vertical strip is Basic Grey from around the time I started scrapbooking over 10 years ago! It was one of those beautiful papers I'd saved 'for a special layout'. I've realised now that saving those just means they never get used, so I'm being a lot more ruthless about getting in and cutting up my papers.


Cute little cluster shot showing off the great range of flowers available from D-lish Scraps. I also got the punchinella from there and the adorable little camera wood veneer piece. I love the Wild Roses as a starting point for building a cluster around, they are just the perfect size,


Top corner cluster is all D-lish Scraps goodies too: flair, mini resin rose, journal-its, punchinella, yellow doily.


I've love to see what you create with the mood board if you give it a go. There's no need to use D-lish Scraps products on it, or you could purchase the matching Just Add Paper kit so you have the perfect embellishments ready to go!